Monday, September 2, 2013

Photography Review: Kenko TelePlus MC4 AF 1.4x DGX Teleconverter for Canon EOS

Hey everyone,
Specs
Today I will be reviewing the Kenko TelePlus MC4 AF 1.4x DGX Teleconverter for Canon EOS Digital cameras (will not work on the Rebel XT/350D). This is the little brother to the Kenko TelePlus PRO 300 DGX 1.4x AF Teleconverter. The MC4 1.4x DGX has 4 different lens elements in 4 different groups and has digital multi-coating. It's 25mm long and weighs 110 grams. It is about $150 online.
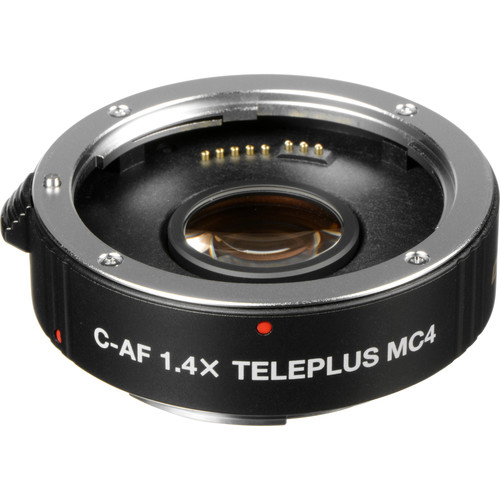
Here is what it looks like. Shiny!
Purpose
This type of lens is called a teleconverter. It's purpose is to extend the focal range of other lenses to get more reach. Since it is a 1.4x teleconverter it will extend your focal range 1.4 times longer than you could currently reach without the teleconverter (making 100mm=140mm, 200mm=280mm, and on and on). It's very easy to use, because it is compatible with Canon's current Autofocus system, so you simply hook it up to the lens mount of your camera, attach your lens, and you're set to go!
What's Included
The Kenko MC4 1.4x DGX comes in a small box with a warranty card, front and back caps, and a carrying pouch that is designed to feel like leather (I don't think it is real leather, but I can't be sure).
Build Quality
It has a smooth exterior and a good build quality. The metal mounts on both sides and solid exterior will make you confident to hook up your largest L glass with no issues or worries. If I did have one grumble with the build quality, it would be the attachment button. It's made out of cheap plastic, but so far has served it's purpose just fine. 
Image Quality
I did this test with a Canon 40D and a Canon EF 80-200mm f/2.8L lens. I will include some exif data with each shot. You can click on each shot to see the full size. TC will stand for Teleconverter during these tests. All shots were taken at ISO 100. All files were shot RAW and converted to TIFF without sharpening.
Original shot without TC. 200mm, f2.8, 1/200sec
Original shot with TC. 280mm, f4, 1/60sec
I did some 100% crops so you could see the image quality up close at different f-stops and focal lengths.

Without TC. 140mm, f4, 1/125sec

With TC. 196mm (140 equivalent), f4, 1/80sec. Possibly very slight camera shake.
Without TC. 140mm, f8, 1/30sec

With TC, 196mm (140 equivalent), f8, 1/20sec
Without TC, 200mm, f4, 1/125sec

With TC, 280mm (200 equivalent), f4, 1/60sec


Without TC. 200mm, f8, 1/30sec


With TC, 280mm (200mm equivalent), f8, 1/15sec

 Conclusion
As you can see from the image samples, the IQ of this teleconverter is very good. However some major drawbacks (just like any converter) are that you have a slower maximum aperture (f4 with the TC vs. F2.8 without) and slower shutter speeds. Even shooting f4 with the TC vs. shooting f4 without you will need to use a slower shutter speed. This means more camera shake and the possibility of a bad picture. I recommend using a tripod unless the it's very bright and you are shooting outside. I didn't find the 1.4x in length too helpful in real world shooting situations with this lens, however it may be more helpful on a longer focal length. Since the 80-200 f2.8L is such a sharp lens, I found it easier to use the high maximum aperture of the lens, coupled with a fast shutter speed and simply crop the picture closer, instead of using the converter which only gave me the results I wanted sometimes. Hope this was helpful, and if you enjoyed reading, don't forget to LIKE ME ON FACEBOOK!

Until next time......

- Jarvis Creative

Monday, August 19, 2013

Sherlock's Day at the Park

My dog Sherlock and I recently had a father son date to our local doggy park. It was a cloudy day so I was working the camera for all it's worth, but it came through a few times for me. Here are some of the "shots of the day".

Just enjoying life....

Yep, still enjoying life.....

Oooo, this stick looks fetchable!

Who's that doggy in the water?!

It's good to be a dog at the dog park....

Squirrel?

Look! I can imitate a war horse! 

Here I come dad!
Hope you enjoy!

Till next time....

- Jarvis Creative

If you like what you saw today, remember to LIKE ME ON FACEBOOK!

Tuesday, July 30, 2013

Photography Tip: Beauty Through Mystery (Creativity Through Soft Focus)

I don't know about you, but sometimes I don't like to look at perfect photos. And as a photographer, I would have a hard time telling you what a perfect photograph is. I could tell you what I think a perfect photograph is, but I doubt that would always agree with what you would think a perfect photograph is.

For example, I think a picture with good bokeh in the background (like above) is amazing, but it almost makes my fiance sick. What one person likes, another may not. That means there are two types of photographers out there: the kind that shoot pictures that try to make other people happy, and the kind that shoot pictures to make themselves happy. I'm more of the second. Of course, when you're doing photoshoots of people, you want to make them happy. But that's a different situation entirely.

Anyway, one way I feel you can expand your creativity is by taking pictures with soft focus. You keep the picture fully out of focus, but not so much that people can't tell what it is. Here are some examples:


This technique is very easy to accomplish. All you have to do is change your lens to manual focus, then keep the frame's focus soft. It may take a few tries to get the shot you want since the focus in the viewfinder may not always match up 100% with the picture taken.

You may love the shots you just saw. If so, go take some of your own and share them on my facebook page. You may hate them. If so, then don't take any, haha.

Bonus: This was an interesting friend I found while taking pictures for this creative tip!

Not a great shot, but makes you realize, as a photographer, you always have to be on the lookout, not only for good photographs, but for your own safety too.

If you enjoyed what you just read, follow this blog, or Like my Facebook page!

Until next time.....

- Jarvis Creative 

Monday, July 15, 2013

Photography Tip: Creativity Using Streetlights and Long Exposure

One interesting (and cool!) way to expand your creativity is by using long exposures. I already did a lesson on shutter speed (You can check it out here!) and you should probably read that first. Last night my fiancee and I visited the Dreher Shoals Dam to get some exercise / peace and quiet. I also wanted to get some pictures of the sunset.


While I didn't actually see the sun (because is was hiding behind the clouds), as it set further and further I did get some beautiful landscape shots.


My favorite from that night!

 We continued to walk until it was pretty dark, so I started messing around, using lights and long exposures.
This picture was captured using a 20 second exposure with cars' headlights and tail lights on the road. You will always need a tripod or other stabilizing device for a picture with long exposure. I used a short concrete barrier by the road.
This picture was captured using a 5 second exposure. I rotated the camera while the shutter was open. The green lights are a green traffic light, the red are car tail lights.
5 second exposure again. The green is the same traffic lights as before, only much closer. The white is oncoming headlights. The orange is a security light in a parking lot we were approaching.
5 second exposure. Same security light as in the last picture, only much closer. This was a sad attempt to use the light to write my name.
5 second exposure. This picture was taken through the windshield of a car at oncoming traffic. Never attempt while driving! I sure wasn't.
5 second exposure of a distant intersection we were approaching. Notice above the red tail lights the yellow and red. That's because the light was changing as we approached.
So, as you can see, these pictures could not really be used in professional application, but they are still fun to do and can really help expand your creativity! Remember to LIKE ME ON FACEBOOK! and follow this blog! Until next time.......

- Jarvis Creative

Wednesday, July 10, 2013

A Day in the Garden

No writing this time, just pictures to tell the story. The garden is my Dad's. It didn't have very much growing, but I took a few pictures for fun.
1/2000sec - f/4 - ISO100
1/2000sec - f5.6 - ISO100
1/500sec - f/4 - ISO100
1/250sec - f/5.6 - ISO100
1/250 - f/5.6 - ISO100

 Remember to LIKE ME ON FACEBOOK!

Until next time......

- Jarvis Creative


Friday, July 5, 2013

Photography Lesson: Why is Shutter Speed Important?

It's time for another important photography lesson!

If you're a veteran to photography, there's a really good chance you know exactly what shutter speed is and how to use it, and nothing I say here will help you. However.......if you're new to photography, one thing you must know is shutter speed is VERY IMPORTANT to proper photo composition. So let's dive right in.

First of all, what is shutter speed? Shutter Speed is the length of time it takes to snap a picture. That wasn't too hard, was it? Why so important, you ask? Well, faster shutter speeds will freeze the motion of whatever you are shooting. At a slower shutter speed, motion can still occur during the shutter click because the click is not immediate. However, slower shutter speeds also allow more light to enter the sensor, creating a brighter (therefore better) picture. Slower shutter speeds are used when light is scarce, similar to aperture.

So basically, it's always best to used the fastest shutter speed that your light will allow, right? Well, not necessarily. It all depends on the creativity you're going for. Have you ever seen those pictures of running water that looked fairy tale smooth? That is not a post processing trick, that effect is created by using a slow shutter speed.

1sec - f/22 - ISO100
The above picture was taken on a cloudy day in a heavily shaded area. What you'll notice about the photo properties is that 1) there is quite a long shutter click of 1 second 2) the f-stop is set at 22 to let very minimal light into the lens/sensor (remember the aperture lesson?) 3) the ISO is set at the camera minimum, so no extra light will be gathered or fabricated (if you don't understand ISO yet, it's ok, I'll do a lesson on it soon enough). So, because the shutter speed is letting extra light in, I had to adjust the other camera settings to combat that. Even though I don't consider this a very good picture, I still got lucky. The sun peaked back out, and even though it was shady where I was, this is the best I could get in broad daylight.

1/2sec - f/22 - ISO100

1sec - f/22 - ISO100
As you can see, the above pictures are very washed out in some areas, the water especially. I even halved the shutter speed in the first one to cut down on light but still had no success. These type of artsy, creative pictures are best taken at daybreak, dusk, or with heavy clouds or shade (just make sure you adjust your white balance accordingly). Also, special filters can be purchased to make long exposures possible in broad daylight.

As in all the above pictures, longer exposures will require a tripod. It's just too hard to hold the camera that still for even a second or two. Another tool I find very helpful is an shutter remote. This lets you click the shutter without touching the camera (therefore you won't bump/move the camera at all).

I'm not going to tell you how to adjust the shutter speed on your camera, since all cameras are different, but I do know that Canon (which I shoot with) has a shutter priority mode abbreviated Tv on the mode dial. I hope this lesson helped out with your knowledge of shutter speed. If you enjoyed reading and found this article helpful, please LIKE ME ON FACEBOOK and share photos of your new found shutter speed skills! I'll leave you with some crazy self-portrait type pictures that were taken at night with extremely long shutter speeds (5-10 seconds). These are the cool type of photos shutter speed practice can produce. The below photographs were not edited or post processed in any way. I took these photographs with a camera that I bought used for $60 and a cheaper lens. I'm only telling you this to stress it's not the equipment you use, but the creativity you use it with.


Until next time......

- Jarvis Creative